|
Pixels - Digital photographs are made up of small squares called pixels (picture elements). Similar to a painting made with dabs of paint with different color to create a cohesive whole drawing, the computer use pixels to display images
|
|
|
Resolution- Resolution is the amount of information in a digitally captured image measured in pixels. The higher the number of pixels, the higher the resolution of the picture, and thus the more photographic the image will be. A low-resolution digital image (at 640 x 480 pixels), for instance, may look excellent when displayed on the Internet, but it can appear fuzzy when printed or enlarged.

|

|

BEFORE
|

AFTER
|
|
|
|
TONE - measure of brightness from complete dark to complete light
- Whites – Areas of extreme brightness where there is absolutely no information(detail) remaining
- Highlights – Bright areas within a photo that still maintain detail
- Midtones – These are neither shadows or highlights but rather a middle value of luminance
- Shadows – Darker areas of the image that still maintain detail
- Blacks – Completely ‘burnt out’ portions of a photo that contains absolutely no detail

|
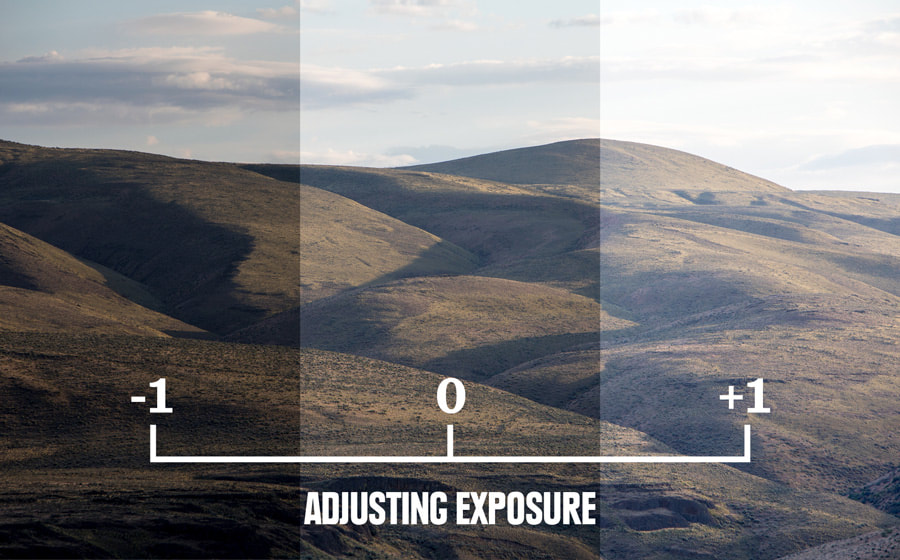
Exposure - The amount of light that falls within a photograph. A photo that is "overexposed" has an overabundance of light; a photo that is "underexposed" has too little light.
|
|
Brightness - This control uniformly changes all the colors, from extremely light (white) to extremely dark (black). You can use it to make the overall picture lighter or darker, not to brighten or darken selective areas.
(In short, exposure has a heavier bias to highlight tones, while Brightness has no bias and affects all tones equally. This means that adjusting Exposure will affect highlights more in brightening or darkening an image than Brightness)
Highlights - adjusts the details in the brighter parts of the photo
Shadows - adjusts the details in the darker parts of the Photo
(Photos taken in bright light may contain glare. Lens glare can be avoided by changing your position or camera direction, but if you already have a photo with glare, adjust (increase) Highlights, (decrease) Shadows, and — if necessary — decrease Brightness. Won’t completely remove glare, but will visibly improve the photo.)
Contrast - The amount of difference between tones in a photo. Increasing contrast gives your photo more colour depth between the shadows and the highlights.
Blackpoint / White Point - The darkest and the lightest parts of your photo, respectively. These settings define the image’s tonal range and impact the functioning of contrast, brightness and other tone-related tools. Especially important for B&W photography. If you’re a lay user, don’t mess with these!
Blackpoint / White Point - The darkest and the lightest parts of your photo, respectively. These settings define the image’s tonal range and impact the functioning of contrast, brightness and other tone-related tools. Especially important for B&W photography. If you’re a lay user, don’t mess with these!
HIGH CONTRAST
|
VS |
LOW CONTRAST
|
|
Saturation - This tool changes the intensity of all the colors equally. Just a tiny boost will improve old photos that look washed out. Use sparingly, especially on portraits or group photos, in order to avoid imparting an unnatural red hue to the subjects’ skin.
|
|
|
Vibrance - Increasing it increases the saturation of less-saturated colors more than the colors that are already saturated. What makes it useful is that it does this without making skin tones over saturated.
|

|
While saturation affects the intensity of all colors in your image, the vibrance slider only affects the more muted colors and does not alter the skin tones and already saturated colors, giving you a better control over how you want the colors to appear in the final image

ASSIGNMENT PART ONE
- Take one photo and edit it 3 different ways to get three different feeling
- Only use the tools above!!!! (Exposure, Brightness, Highlights, Shadows, Contrast, Black Point, Saturation, and Vibrance)
- you can also crop and rotate
- Do this manually NOT FILTERS!!!!
- use whatever editing app / software you have available
- You will have 4slides in google slides
- 1 - title (Editing part one) , Name, & Hour AND the Original Photo
- 3 - edited photos labeled with intended feeling and what you adjusted to try to get that feeling
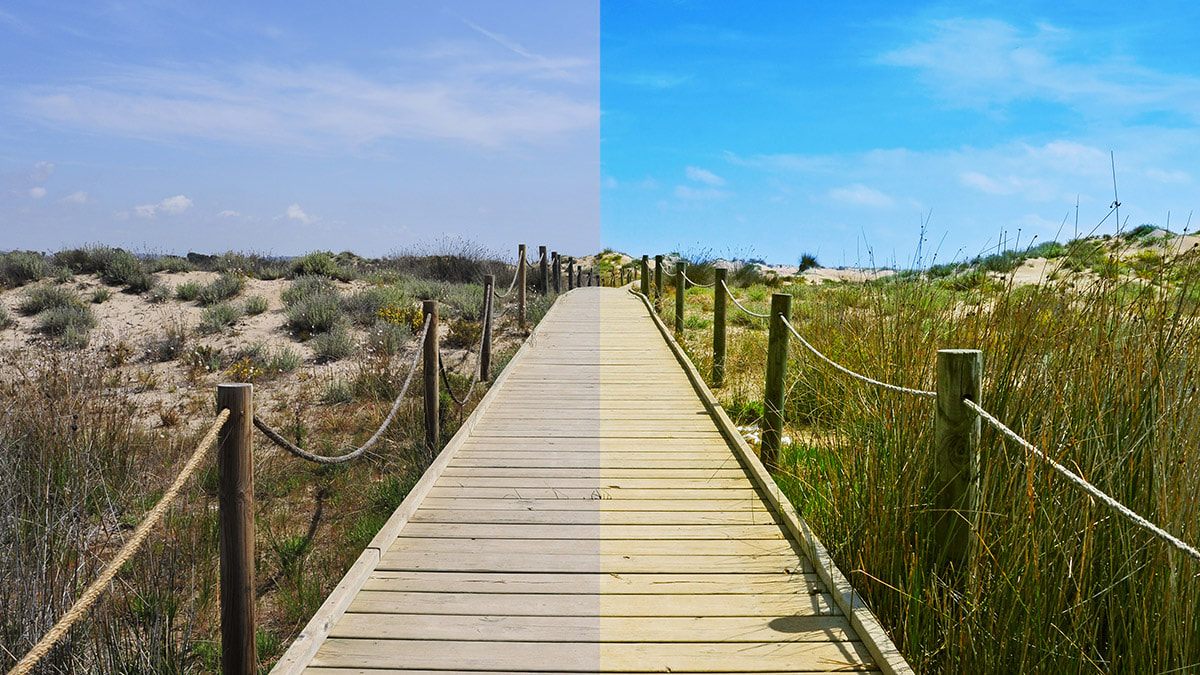
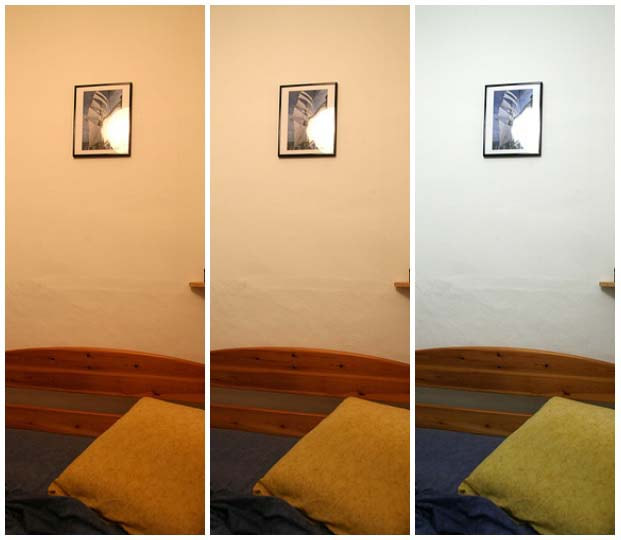
White Balance
The color of the light impacts the way your photographs look. The White Balance setting can help you adjust for the varying light conditions and take care of color casts, if any. It can be adjusted in-camera while capturing the shot, or you can change it in post-processing if you photograph in raw. To know more about white balance and color temperature, do check out the post here.
The color of the light impacts the way your photographs look. The White Balance setting can help you adjust for the varying light conditions and take care of color casts, if any. It can be adjusted in-camera while capturing the shot, or you can change it in post-processing if you photograph in raw. To know more about white balance and color temperature, do check out the post here.
|
Warmth - Increasing it boosts orange tones; decreasing it boosts blue tones. If a photo looks “too blue” or “too yellow”, a little tweaking with this tool can make it look more natural.
|

|
|
Tint - If an old color photo has got a color cast or sepia tones, a slight adjustment with this tool may correct them. Use it liberally, and you’ll change the picture’s colors entirely for a surreal feel.
|

|

|
|
Sharpness - Increases the contrast between dark and light pixels along the edges of objects in a picture, thus highlighting the edges. It doesn’t correct blurred, out-of-focus photos. Apply 5–10% sharpening, as the last step in editing. Don’t over-sharpen, otherwise you’ll get unsightly halos along the objects’ edges and noise throughout.
|

|
Definition / Clarity - increases midtone contrast and specific sharpening
Your photo editor’s sharpening tools increase the contrast between different tones of pixels: “sharpen” refers to a contrast between light and dark pixels, while definition/clarity refers to contrast between middle tones. As such, definition/clarity tends to amplify an image’s textures, while sharpen increases edge contrast.
Your photo editor’s sharpening tools increase the contrast between different tones of pixels: “sharpen” refers to a contrast between light and dark pixels, while definition/clarity refers to contrast between middle tones. As such, definition/clarity tends to amplify an image’s textures, while sharpen increases edge contrast.
|
Noise Reduction - Shooting at a high ISO, long exposures and careless editing can all contribute towards image noise, among other reasons. Noise ReductionReduces the apparent noise in your photo, but it also harms legitimate details and makes them less sharp. If you use too much noise reduction, you'll end up with photos that look like plastic.
|

|
|
Vignette - Darkens the edges of a photo, while leaving the center bright. Use it to give photos a vintage look or draw attention to the brighter part.
|

|

|
ASSIGNMENT PART TWO
- Take one photo and edit it 3 different ways to get three different feeling
- Only use ANY OF THE EDITING tools above!!!!
- you can also crop and rotate
- Do this manually NOT FILTERS!!!!
- use whatever editing app / software you have available
- You will have 4slides in google slides
- 1 - title (Editing part one) , Name, & Hour AND the Original Photo
- 3 - edited photos labeled with intended feeling and what you adjusted to try to get that feeling
PHOTO EDITING APPS AND WEBSITES
- Pixlr – an online high-end photo editing site that allows you to work in layers, replace color, transform objects, and more – all from your browser (Free).
- pho.to – a simple online photo editor with fun and creative photo effects and instant editing tools, perfect for creating content for social media engagement (Free).
- VSCO Cam – is one of the most popular mobile photo-editing apps available on the market, Trend-driven filmic presets are the driving force of this app but it also comes packed with top performance features, including high resolution imports (Free, with paid filters $57/each).
- Lightrookm - Adobe Photoshop Lightroom is a free, powerful photo editor and camera app that empowers your photography, helping you capture and edit stunning images.Easy-to-use image editing tools like sliders and filters for pictures make photo editing simple. Retouch full-resolution photos, apply photo filters, or start photo editing wherever you are.
|
|
|
ADDITIONAL RESOURCES
|
|
|
|
|
This one is just sort of fun. People send in photos and this guy explains how he would edit them.
|
